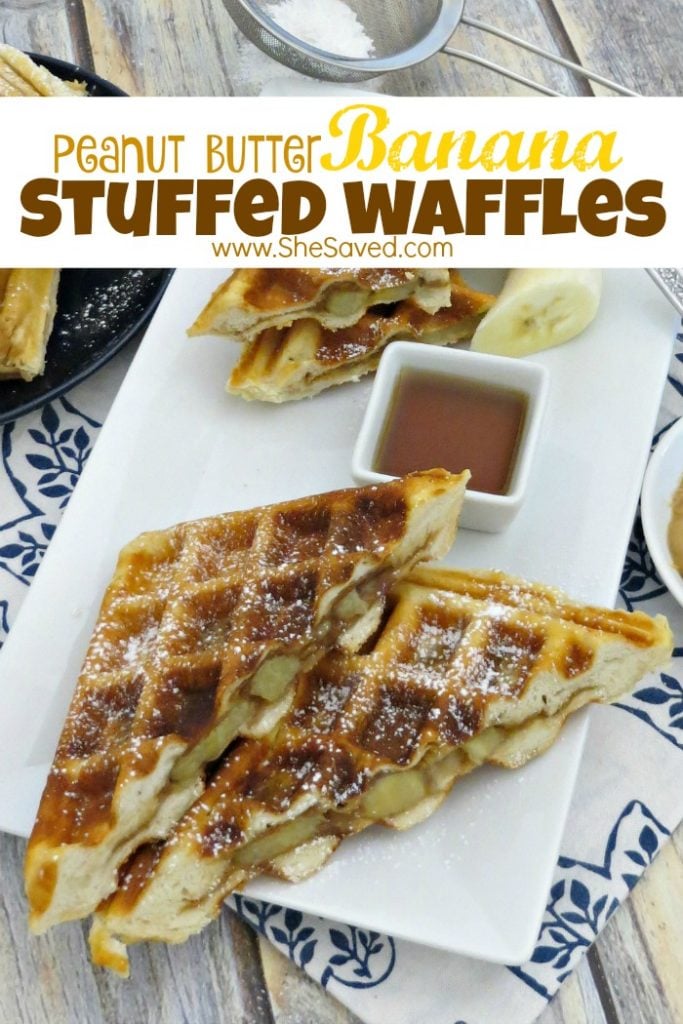
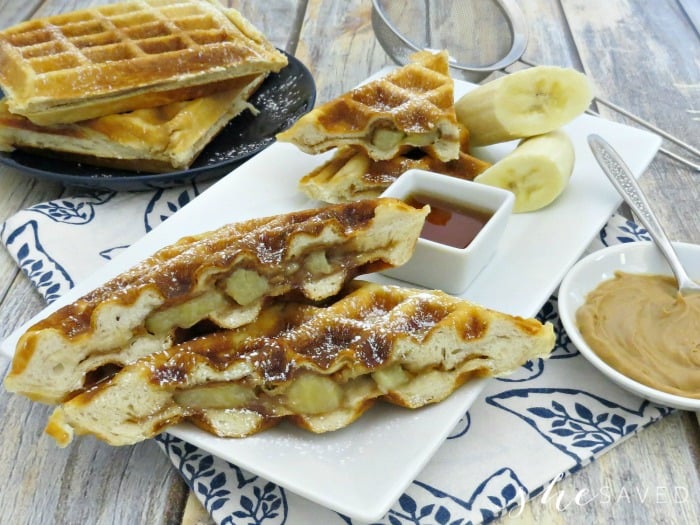
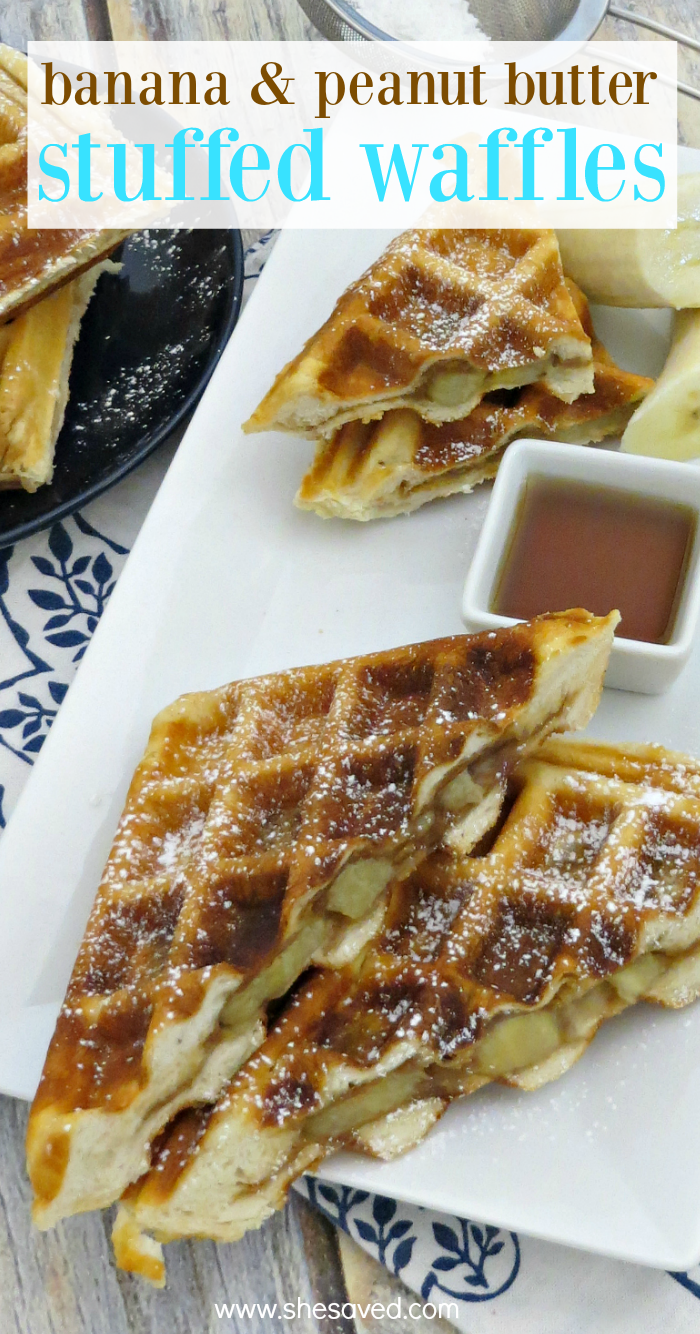
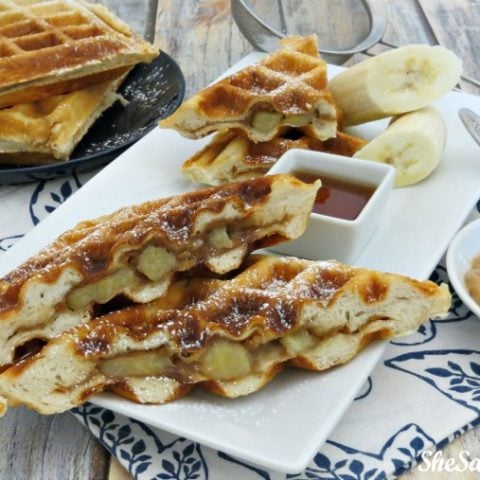
Peanut Butter Banana Stuffed Waffles
I love fun and unique breakfast ideas and this is one of our new favorites. These Peanut Butter Banana Stuffed Waffles are so easy and even better, super yummy!
What I love most about these stuffed waffles is that this is a breakfast you can cook up easily. Who doesn’t love hot melted peanut butter?
With a four spot waffle iron, I am able to make four at a time with my waffle maker, which makes these a nice choice when we have a bigger breakfast crowd.
I love my waffle iron, and I am always looking for new and unique ways to use it.
I recently shared my Omelet Waffle Recipe, it’s another one of our family favorites. My favorite waffle iron to use is this Hamilton Beach 26020 Belgian Style Waffle Baker. I love the fact that it stores easy, has four waffle compartments and it also gets great reviews.
I love my waffle maker. They make great wedding gifts too!
Peanut Butter Banana Stuffed Waffles
(makes 4 whole waffles)
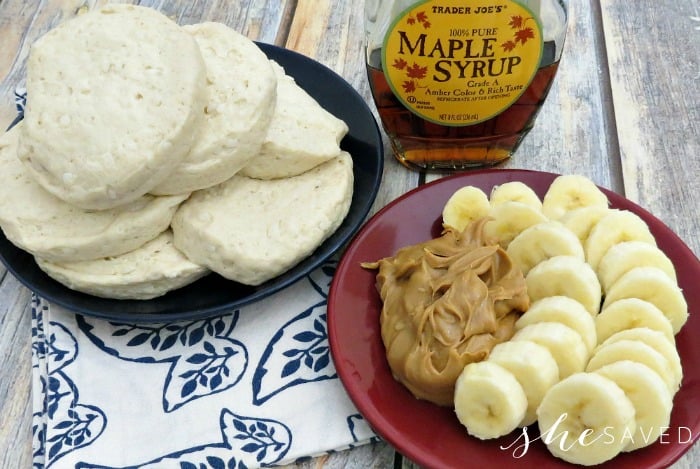
Ingredient for making stuffed waffles
8 large home-style biscuits (like Grands!)
1 large banana, cut into thin slices
8 tablespoons peanut butter
Maple syrup for dipping
Powder sugar for serving
How to make stuffed waffles with Grands
Turn on your waffle maker, and allow it to heat up.
While the waffle maker is heating up, you can assemble your waffles.
Using your fingertips, flatten and spread out each biscuit until it’s about the size of one grid of your waffle maker. If you’re using a square waffle maker, this doesn’t have to be perfect. These will expand quite a bit as they cook and fill up the entire grid.
After you’ve flattened four of the biscuits, spread each one with 2 tablespoons of peanut butter. Leave about 1/4″ around the edges to seal the biscuit.
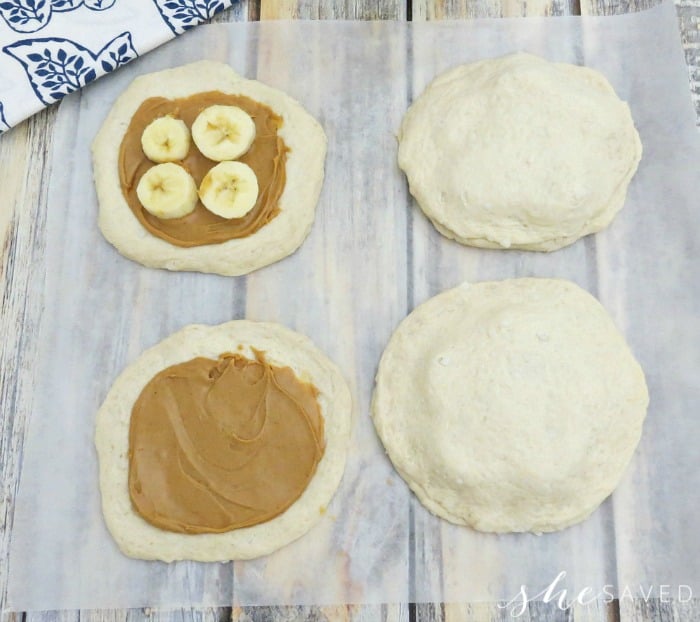
Thinly slice your banana, and divide the slices between all four biscuits. I was able to fit 4 to 5 slices on each one.
Flatten the remaining four biscuits and place them on top of the bananas.
Use your fingertips to seal around the edges. Again, the waffle maker does a good job of this, so it doesn’t have to be perfect. Sealing the edges just helps you transfer them without the bananas falling out.

Cooking stuffed waffles in waffle iron
When your waffle maker is ready, spray both sides with nonstick cooking spray, and place each of the prepared biscuits in the center of each grid.
Close the waffle iron, and hold it down for 10 seconds. Continue gently pressing down until the waffle maker locks. If it feels like your smashing the waffles, just hold it tightly and don’t lock it.
Allow the waffles to cook for 60 seconds before you check them. If they’re nicely browned, they’re done. If not, you can continue cooking them until their brown to your liking.
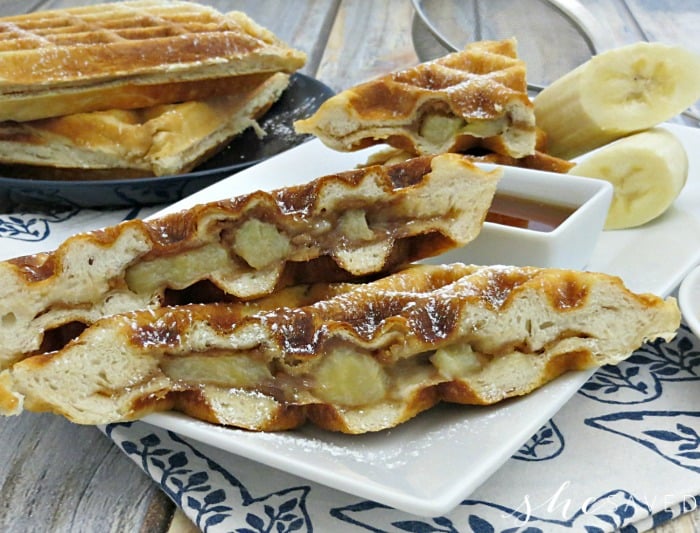
When your stuffed waffles are done cooking
When the waffles are done, carefully remove them and use kitchen scissors to cut them apart.
Place them on a wire rack to cool for a few minutes before serving. The melted peanut butter is very hot!
Pour the maple syrup into a small serving dish, and arrange the waffles on your platter with the syrup and a little powdered sugar sprinkled on top.
Notes for making the BEST stuffed waffles
I suggest using a larger biscuit, so you have enough dough to spread them out. We used one can of Grands! homestyle biscuits, but you can use any kind you want.
You can also customize these to your liking. If you like more banana or peanut butter, feel free to add it. Chopped nuts would also be delicious! If you like them less “bready” then you can use more filling.
Print the Recipe for Banana Stuffed Waffles
Peanut Butter Banana Stuffed Waffles
These peanut butter banana stuffed waffles are a level up when it comes to yummy breakfast ideas. Served with syrup, they are easy to make and a way to wow your breakfast crowd!
Ingredients
- 8 large home-style biscuits (like Grands!)
- 1 large banana, cut into thin slices
- 8 tablespoons peanut butter
- Maple syrup for dipping
- Powder sugar for serving
Instructions
Turn on your waffle maker, and allow it to heat up.
While the waffle maker is heating up, you can assemble your waffles.
Using your fingertips, flatten and spread out each biscuit until it's about the size of one grid of your waffle maker. If you're using a square waffle maker, this doesn't have to be perfect. These will expand quite a bit as they cook and fill up the entire grid.
After you've flattened four of the biscuits, spread each one with 2 tablespoons of peanut butter. Leave about 1/4" around the edges to seal the biscuit.
Thinly slice your banana, and divide the slices between all four biscuits. I was able to fit 4 to 5 slices on each one.
Flatten the remaining four biscuits and place them on top of the bananas.
Use your fingertips to seal around the edges. Again, the waffle maker does a good job of this, so it doesn't have to be perfect. Sealing the edges just helps you transfer them without the bananas falling out.
When your waffle maker is ready, spray both sides with nonstick cooking spray, and place each of the prepared biscuits in the center of each grid.
Close the waffle iron, and hold it down for 10 seconds. Continue gently pressing down until the waffle maker locks. If it feels like your smashing the waffles, just hold it tightly and don't lock it.
Allow the waffles to cook for 60 seconds before you check them. If they're nicely browned, they're done. If not, you can continue cooking them until their brown to your liking.
When the waffles are done, carefully remove them and use kitchen scissors to cut them apart.
Place them on a wire rack to cool for a few minutes before serving. The melted peanut butter is very hot!
Pour the maple syrup into a small serving dish, and arrange the waffles on your platter with the syrup and a little powdered sugar sprinkled on top.
Notes
I suggest using a larger biscuit, so you have enough dough to spread them out. We used one can of Grands! homestyle biscuits, but you can use any kind you want.
You can also customize these to your liking. If you like more banana or peanut butter, feel free to add it. Chopped nuts would also be delicious! If you like them less "bready" then you can use more filling.
Nutrition Information:
Yield: 4 Serving Size: 1Amount Per Serving: Calories: 288Total Fat: 18gSaturated Fat: 4gTrans Fat: 0gUnsaturated Fat: 12gCholesterol: 0mgSodium: 241mgCarbohydrates: 26gFiber: 3gSugar: 10gProtein: 8g
*This is just an estimate

Meet the author – Keri Lyn
The creative and frugal mind behind She Saved for over 12 years now, Keri Lyn shares her adventures in parenting along with her love for family travel, country living and brand marketing. A self-proclaimed “brand loyalist”, Keri Lyn is known for her strong and enthusiastic voice when it comes to the products and brands that she loves. She Saved has become a community for like-minded consumers who appreciate saving money, time and sanity by getting the best deals on quality products and experiences.


Oh wow! That is WAY to easy and looks so tasty!
We’ve been on a serious waffle kick recently and this looks like such a fun way to add a new twist! Know my kiddos will love these!
These look amazing and perfect for lazy Sunday breakfast! I’d love to have you stop by and link up at our new link party, You Link It, We Make It, where we actually make the features each week! Thanks so much for sharing! http://tinyurl.com/gomfo8w
Yummy! Thank you for sharing at Merry Monday!
Hi Keri Lynn, These waffles look awesome, especially to those of us who love the combination of peanut butter and banana. (Maybe you should call them Elvis waffles! Thanks for sharing this recipe & techniques! Blessings, Janet
I’ve never had a stuffed waffle before but I’m no stranger to bananas and peanut butter ON my waffle. This looks like it’s WAY easier to eat! Can’t wait to try it! Thanks for linking up with Delicious Dishes Recipe Party!
Whoa! Mind blown right here!! My kids would probably think this is pretty rad. 🙂 Thanks for sharing at the #HomeMattersParty!
All of my son’s favorite things! I will have to try it. Thanks for sharing.
This looks yummy and I think my kids would love it! Pinning…I would love for you to share this at Welcome Home Wednesdays!
Biscuit in a waffle maker-must try now! Looks so comforting and yummy.
Idk how you do it, but hats off to another amazingly mouth-watering creation! And you know I simply must to pin this 🙂 have a great day xo
Thank you Jess… have a wonderful day!
Wow this looks so much easier to make than I expected, definitely going to try them!